If you would like to download the PDF pattern, please click the button below to download the file.
If you prefer to view the full pattern directly on this website, you can continue scrolling to read the complete instructions further down on this page.
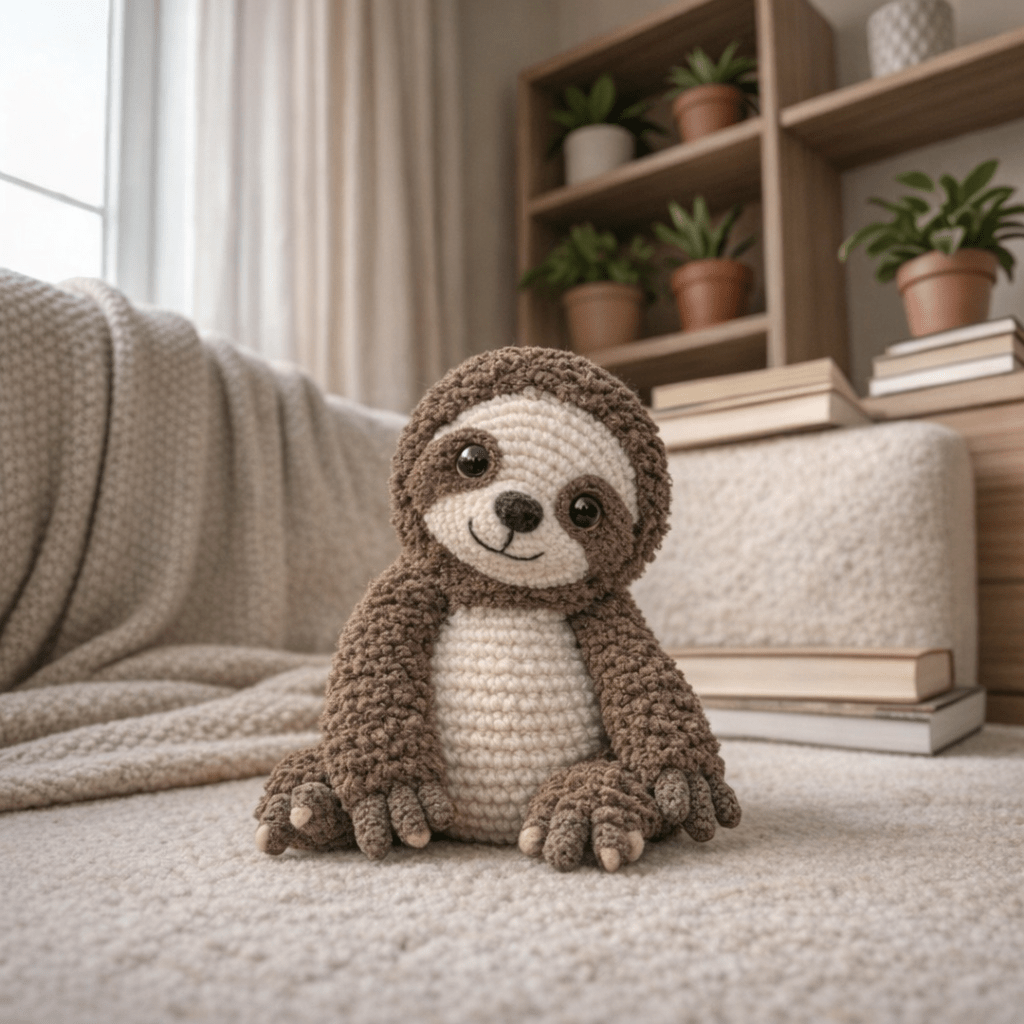
Sloth Crochet Pattern
• Bulky/Chunky velvet yarn Himalaya Dolphin baby 100g/120m or analogue (light colors No.308 or 363, light brown No.317, brown No.337 or any other shade of your choice)
• Sport weight/4ply yarn Yarnart Jeans 50g/160m for face decoration (black color No. 53, brown color No. 70)
• Hook size 3.5 mm Safety eyes size 12 mm;
• Safety pins for fastening smal pieces befo re sewing;
• Fiberfil;
• Needle with a wide eye for sewing pieces;
• Crochet marker (pin) for marking a round beginning;
• Scissors; Any thin knitting needles for fixing a head before sewing;
• Lighter for singeing ends;
• Needle size 8-10 cm and nylon thread (or any other strong thread) for needle sculpting.
• CH – chain
• MR - magic ring
• SL ST – slip stitch
• SC – single crochet
• NC – increase (make 2 sc in one stitch)
• DEC – decrease (2 sc together)
• ( .)*6 – repeat instruction in brackets 6 times
The size of a toy TOTALLY depends on YOUR crocheting density and yarn quality, and also on a technique of crocheting (crosses, checkmarks or mixed). I crochet in mixed way. One skein of the main color is enough for one toy. The toy height is 23 cm.
I highly RECOMMEND you to use a hook no more than 3.5mm or crochet tight enough so that there are no “holes” and the toy looks professional. Also, pay attention to stuffing the toy, so that you give a shape, highlight cheeks, tummy and other roundness. I stuff the toy tight enough, except for parts where it is not required (arms, legs for example). Take your time, read the description carefuly, and then the result wil please you.
Al pieces are crocheted in spiral rounds.
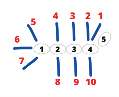
Begin crocheting with complementary color: R1. 5 ch, start in the second chain from the hok: inc, 2sc, 3sc in the last chain, 3sc on the other side of the chain (10) See first round diagram
R2. 2inc, 2sc, 3inc, 2sc, inc (16)
R3. 16 sc (16)
CHANGE COLOR TO BROWN (EYE SPOTS)
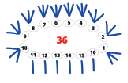
R4. In brown: (3 sc in one stitch)*4, in milky:
(3 sc in one stitch)*2, in
brown: (3 sc in one stitch)*4 , 6sc (36)
Look at the diagram of this round:
R5. In brown: 12sc, in milky: 6sc,
in brown: 12sc, 6sc (36)
R6. CHANGE COLOR TO MILKY: 36SC (36)
Note, that when you crochet in brown stitches, you need to crochet
through back loops so that the contour of the eye spots looks clearer
R7. Change color to the main: 36sc (36)
R8-R10. 36sc (36) 3 rounds Insert safety eyes between rounds 4 and 5.
Focus on brown eye spots. A distance between the legs of the eye
of about 12sc. The photo shows the points where I inserted the leg of
the eye on my toy.
Check that they are level before attaching the eye.
And only then fasten it with a plug
R11. (4sc, dec)*6 (30)
R12. (3sc, dec)*6 (24)
R13. (2sc, dec)*6 (18)
Stuff the head with fiberfill. Push it into the zone of the muzzle with
your fingers and a little effort, so that the muzzle is convex. Pay
attention to the cheeks, stretch the canvas to the sides and stuff well
these places, so that the cheeks are rounded.
R15. (1sc, dec)*6 (12) Stuff the head completely
R16. 6dec (6) + sl st
Cut the yarn and pull the hole closed with a needle.
R1. 6sc in MR (6)
R2. 6sc (6)
R3. (sc, inc)*3 (9) Crochet sl st, cut the yarn, leaving a long tail for sewing
1. 6sc in MR
2. 6inc (12)
3. inc, 11sc (13)
4-6. 13sc (13) 3 rounds
7. 11sc, dec (12)
8-10. 12sc (12) 3 rounds Stuff with fiberfill slightly to keep the legs soft.
11. (2sc, dec)*3 (9)
12-15. 9sc (9) 4 rounds
16. dec, 7sc (8)
Fold the leg in half and crochet 4sc through both sides. Cut the yarn, fasten off.
1. 6sc in MR
2. 6inc (12)
3. (3sc, inc)*3 (15)
4-6. 15sc (15) 3 rounds
7. (3sc, dec)*3 (12)
8-9. 12sc (12) 2 rounds
Stuff with fiberfill slightly to keep the legs soft.
10. (2sc, dec)*3 (9)
11-13. 9sc (9) 3 rounds
14. dec, 7sc (8)
Fold the leg in half and crochet 4sc through both sides.
Cut the yarn, fasten off.
R1. 6sc in MR
R2. 6inc (12)
R3. (1sc, inc)*6 (18)
R4. (inc, 2sc)*6 (24)
R5. (3sc, inc)*6 (30)
R6. 1sc, inc, (4sc, inc)*5, 3sc (36)
R7. Join the hind legs in this round (marker passe on the back):
7sc, 4sc with the first hind leg, 14sc, 4sc with the second hind leg,
7sc (36)
R8. (4sc, dec)*6 (30)
R9. 30sc (30)
R10. 10sc, 6dec, 8sc (24)
R11. 24sc (24)
R12. (2sc, dec)*6 (18)
R13. 18sc (18)
R14. Join the forelegs in this round: 4sc, 4sc with the first foreleg, 4sc,
4sc with the second foreleg, 2sc (18)
Everyone has a different crocheting density and degree of shifting
rounds, so check if the forelegs are even in
relation to the hind legs. If it is not so,
then correct Rnd 14 and crochet
according to your scheme.
Cut the yarn, leaving a long tail
for sewing pieces.
Stuff the body with fiberfill.
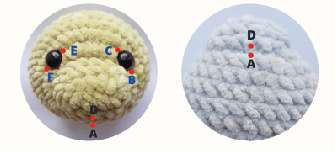
Start with the needle sculpting. Take a needle, suitable in length, and nylon thread (or any other strong thread). The stronger tightening is, the more convex the toy’s cheeks are.
Read the detailed description of tightening further.
Insert the needle into round 4 (which we crocheted sl st) at point A and output at point B close to the eye. Then insert at point C also close to the eye and output at point D (just above point A, literally 2-3mm).
Then enter the needle at point A and output it at point E close to the other eye. Then insert the needle at point F close to the eye and return to point A.
Take both thread ends and pull tight each one. Push on the eyes and muzzle with your fingers, to make the tightening correct and symmetrical. Fasten off, making a couple of knots, when you like the muzzle looks like. Hide the thread ends inside the head.
EMBROIDER A MOUTH, EYEBROWS AND EYELIDS:
Use yarn YarnArt Jeans and embroider eyelids, eyebrows and a mouth with black color. I embrodered a nose with a brown thread.
SEW THE HEAD TO THE BODY:
Mark a smooth location of the head with two knitting needles. Fix the head, so that the neckline is close to the place of the needle sculpting. Look at the photos below. Sew with the yarn tail, which remains after crocheting the body. Strengthen the neck, stuffing it tightly with fiberfill.
SEW ON THE TAIL:
Sew the tail so that it is an additional support for the toy in a sitting position.
CROCHET THE CLAWS:
Crochet the claws at you own discretion. I used yarn YarnArt Jeans, choose the color to your taste.
First, lay the toy flat on the table and straighten the legs. Mark the places with pins or markers where the claws will be crocheted (3 pieces on each leg). When crocheting, the claws are twisted to the front side, i.e. "on you", so keep this in mind when you start crocheting the claws. It will be ugly if they stick out in different directions. Our task is to crochet the claws so that they are directed towards the center of the toy.
Crochet between rounds 1 and 2 of the legs.
Insert the hook, grab the thread, bring it out and crochet ch1, then crochet according to the description:
(ch6, 5 sl st from the second chain on the hook, 1 sl st into the stitch on the leg) *3 - the instruction in brackets is 1 claw, we need to crochet 3 of them.
For the claws on the forelegs: ch6, 5 sl st from the second chain on the hook, on the hind legs: ch7, 6 sl st from the second chain on the hook.
Cut the yarn, fasten off, bring out 2 ends at any point on the leg, tie a couple of knots and hide the parts inside
You’re all done with your Baby Sloth!
I hope you enjoyed making this pattern as much as I enjoyed creating it. If you loved this pattern and would like to explore more crochet designs, patterns, and cute creations, feel free to visit my Etsy shop:
Etsy Shop I would also absolutely love to see your finished plushie creations. Thank you so much for your support and happy crocheting!